At first, I wanted a working Zotero template. Then I wanted to know how to customize it.
The main things I wanted to know were:
- How do I pick custom import options?
- What information could I bring in from Zotero?
- Does each import overwrite previous imports?
- Is it possible to separate colours?
I covered these in my video and will answer them in this article.
Selecting custom Zotero import options
When I wrote about using Obsidian and Zotero to write more consistently I discussed Zotero and the Zotero integration plugin.
Once the Zotero integration plugin is installed, the import formats are the custom imports you can pick from.
Each import format can have different:
- Output path. Where the imported highlights go.
- Image output path. Where the image highlights go.
- Template file. Instructions on how to bring Zotero highlights in.
There is a bibliography style option. I don’t use this because I do the citation work on export. From Obsidian to Word.
Data explorer
The data explorer is how you find out what you can import from Zotero.
Going into the command palette (ctrl + p or cmd + p) You can select Zotero Integration: Data explorer.
Preview Import Format shows you what the import format will do. From the Template instructions.
Prompt For Selection shows you all the available information you might want o import.
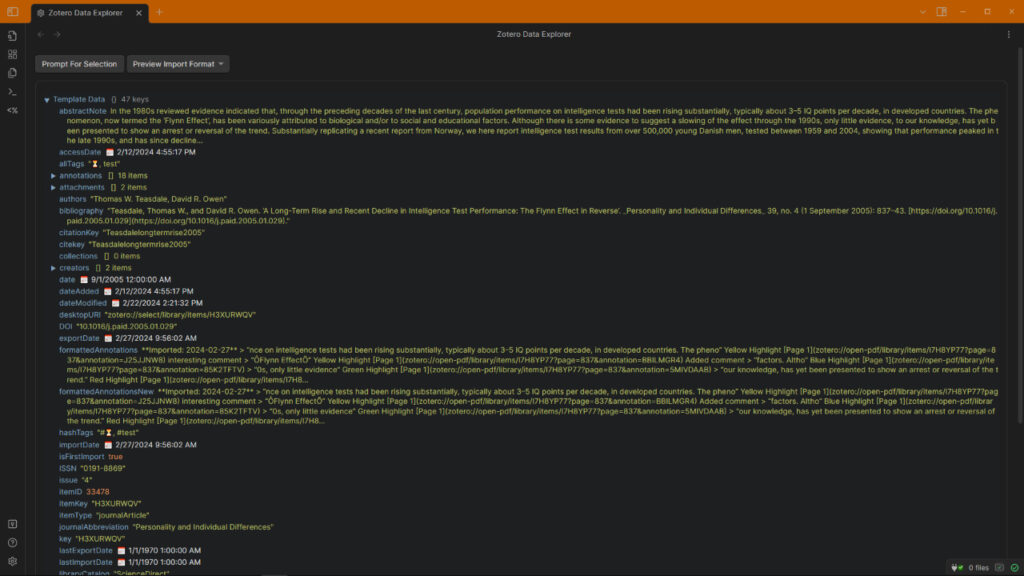
Data explorer Prompt For Selection will ask you to select a Zotero Item. Pick one with highlights.
Yes. It looks scary. Only pay attention to the blue words! The rest is from your selected Zotero item.
Putting the blue words into {{}} will tell Obsidian what to import.
The green and white text is an example of what would be imported for that Zotero item.
Basic import
I am guessing you want:
- {{title}} – Title
- {{authors}} – Authors
- {{pdfZoteroLink}} – Link to Zotero
Other popular information includes:
- {{bibliography}} – Bibliography
- {{hashTags}} – Zotero Item tags
- {{date}} – Zotero item date
- {{importDate}} – Zotero to Obsidian import date
- {{url}} – Online link. Often a papers publication library.

Importing annotations is where the customization can get a little crazy.
Each highlight in Zotero is called an annotation. The 3 Zotero tools are different types of annotation.
Highlight text, Add Note, and Select area can all have comments and tags.
Importing comments and tags for annotations is different from the main Zotero item.
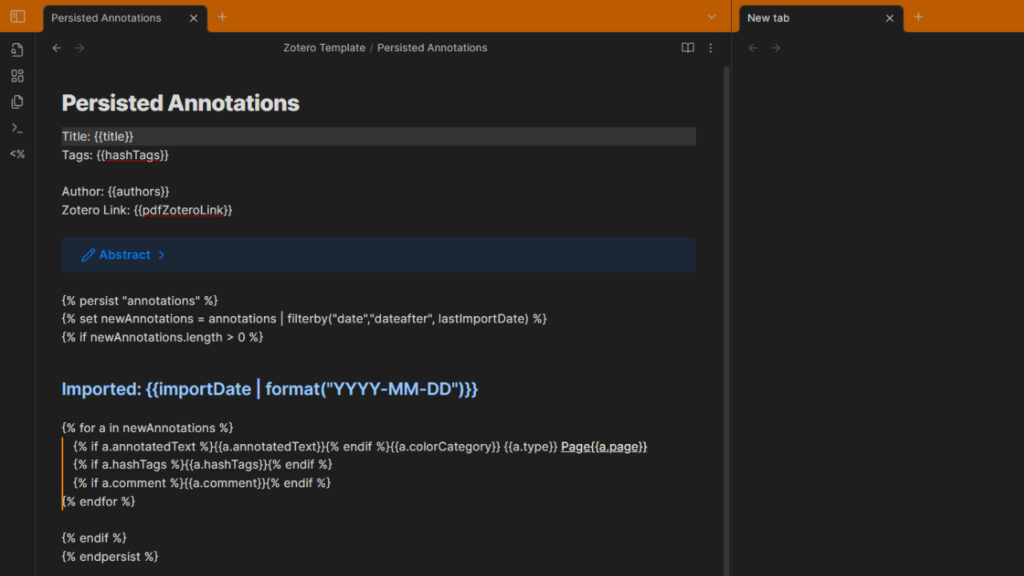
{{formattedAnnotations}} is for a basic import.
Look at the image above. The 2 big blocks of green text are the formatted annotations.
They show:
- Imported date
- Annotation in a quote block
- Annotation colour
- Annotation type EG: Highlight
- Page number with Zotero annotation link.
- Added comment
This is good enough for most people.
I don’t use this because I don’t like the quote block. Otherwise, my template is the same.
Persisted custom annotations
Each time you import the same Zotero item, the Obsidian file will be over written. Unless you tell it otherwise.
You could make multiple imports. But that can get messy.
I only import from Zotero once, so this isn’t an issue for me.
However, persisting parts of the Obsidian file lets you keep parts the same while updating other parts.
{% persist "annotations" %} starts the section you want to keep the same.
{% endpersist %} ends the section.
Use the data explorer to find what parts of annotations you want to import.
You can use annotations. then add the information you want. Or replace annotations with anything else EG: a.
To check for information, ask if there is something.
{% if a.annotatedText %} if there is annotated text do something, if not, don’t.
{{a.annotatedText}} the something. Add annotated text.
{% endif %} stop looking if a.annotatedText.
In the example above, I have done the same if questions for annotated text, hashtags for the annotations and comments on the annotations.
After the annotated text I want the colour and annotation type to be on the same line.
{{a.colorCategory}} is the colour word EG: Yellow
{{a.type}} is the annotation type EG: Highlight
There is also a link to the annotation which shows the page number.
{{a.page}} is the article page number EG: 1
{{a.desktopURI}} is the Zotero link. Look at the below image to see this.
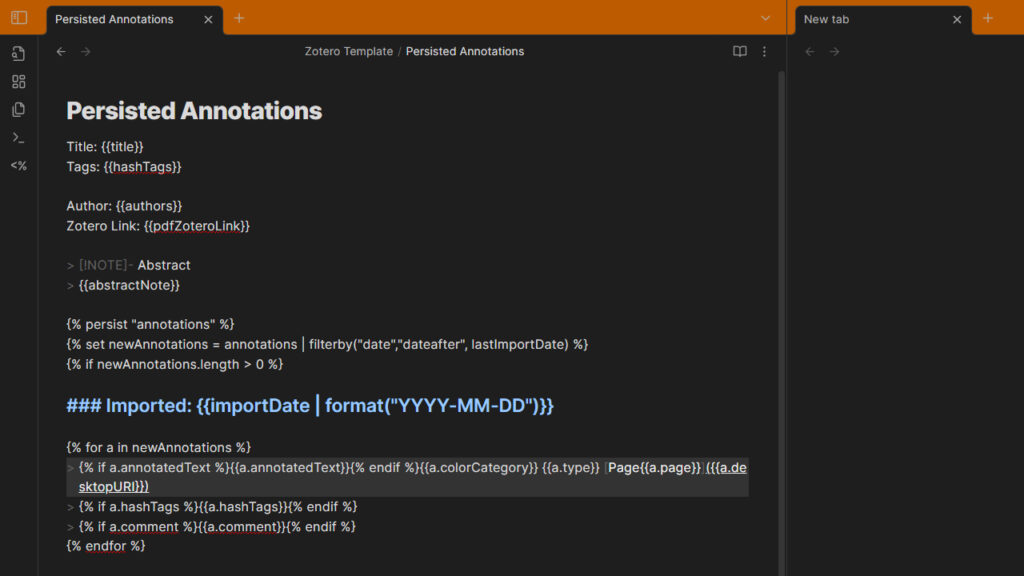
Because Obsidian is markdown, some symbols are hidden in live preview. The source mode shows everything in the file.
External links in Obsidian are formatted:
[Text shown](link destination)
I want the text shown to be Page, then the page number.
[Page {{a.page}}]
I then want the Zotero link as the destination.
({{a.desktopURI}})
Thus [Page {{a.page}}]({{a.desktopURI}}) gives me the page number linking back to the Zotero annotation.
Separate by custom heading highlights
This is one of the more complex things you could do with the Zotero Template import.
I learned about the foundations from this video by Ammar Says and Luke’s template.
There are changes from the original template.
Each step can be customized:
- Set Zotero Colors
- Set Colour Heading
- Switch annotation type label
- Set annotations to match custom colours
- Page number with Zotero annotation link.
- Add annotations under custom colour headings
I recommend downloading the template and playing around with the import.
Look for words that you recognize from a test import, and search for them in the template.
Some custom options you will likely want to customize:
- Heading labels for each colour
- Annotation information brought in
- Annotation formatting
Both the annotation information and formatting customization can be done using the data explorer. As explained above.
set colorHeading is where you customize the headings.
“blue”: “Blue”
Could be changed to
“blue”: “Background information”
And it is at this point, that you can go wild 😁